Photography Tutorial: How to Take Pictures at Night
EducationPhotography Tutorial: How to Take Pictures at Night

Interesting pictures can be taken at night if you are equipped with the right equipment as well as the right knowledge and skills. During this Christmas season, there are many opportunities and beautiful night scapes that merit a photographers' interest and test their skills.
Even if you are just new in photography, it is possible to get good pictures at night using available light. The key in photography has always been light. Adequate amounts should be received by the camera to make the proper exposure and reveal details of objects taken at night.
Central to taking pictures at night, therefore, will be to bear in mind the following things:
1. The type of camera that you use.
You can take pictures at night using your automatic camera as long as you can find a bulb setting or if it has a manual setting like what you can find in a Panasonic Lumix LX5.
The bulb setting is usually indicated in your camera's dial with the letter "B". If you cannot find it, then you need to invest in a camera that has this feature so you can pursue your interest in night photography. To make the proper exposure, automatic compact cameras activate the flash to illuminate the subject. That makes you lose the desired scene you wish to take.
Digital single lens reflex or DSLR cameras have standard manual settings available. This can also be found in the gradually pervasive mirrorless interchangeable lens cameras or MILCs.
Why do you need the manual settings? Manual settings allow you to make long exposures, meaning, you can set the shutter speed (in seconds) it in such a way that the aperture of your camera's lens is kept open to allow available light to gradually make the proper exposure. Without this, the pictures you take at night will just be dots of light. You will not be able to provide much more detail unless your subject is adequately lighted by some outside source. But this is not possible when taking pictures of the night scape.
2. The lens capability of your camera.
Each lens has its own capabilities and limitations. The lower the focal length (indicated in mm), the better you are able to harness available light to make the proper exposure. For example, an 18 to 55 mm lens works better than a 28 to 55 mm lens. Even if your camera is an automatic one but has a large lens or feature such as an ultra wide angle lens, this will work better than those with small lenses.
For zoom lenses which require more light for proper exposure, the way to go is to delay the shutter speed to make the proper exposure. The scene below was taken using a 45 to 200 mm Panasonic Lumix G Vario lens at a shutter speed of 6 seconds and a focal length of 72 mm.
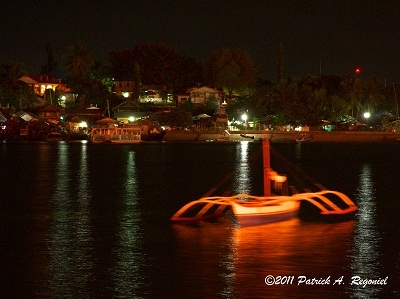
Notice that even in low light conditions, proper exposure was made to show even details in the background. The boat at foreground is a little bit blurry because of the breeze pushing the boat forward within the 6 second exposure. The stationary background is much more distinct.
3. A steady platform.
The above picture is not possible without the use of a steady platform like a tripod. Almost every camera has a tripod mount hole where you can screw in the camera to keep it steady. If you are not able to bring one during your night photography sessions, try to find a post, a table or sturdy platform where you can place the camera and put in some pebbles or pieces of paper under it to focus on your desired scene. Just make sure your camera will not fall.
The camera's timer will be helpful in activating the shutter once you have set up your camera on a steady platform. Letting the camera activate the shutter itself will prevent unnecessary movement as when you push the shutter button yourself.
4. ISO setting.
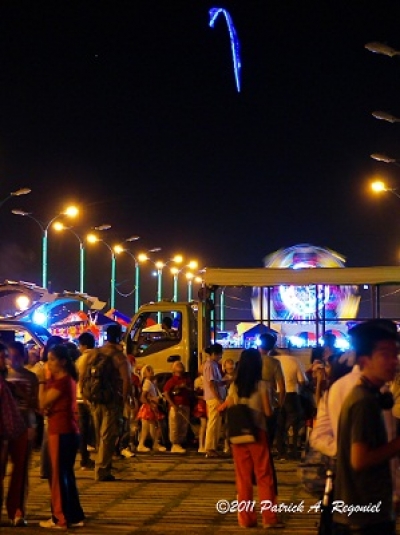
Proper exposure could be achieved in automatic cameras and of course the modern DSLRs and MILCs with high ISO settings. ISO settings let you choose the sensitivity of your "film", to enable it to capture scenes under low light. A quick shot below using the camera's automatic mode was taken using an ISO setting of 400. This is sensitive enough to capture a flying night light sent up high by playing kids.
High ISO settings of 6400 is possible in modern cameras so it is possible to take pictures even in low light. The catch, however, is that exposure at this high ISO setting will show pixelated, or grainy pictures. If you need good quality pictures, you should set the camera at the lowest ISO setting possible and make the proper shutter exposure. Lower ISO setting means longer shutter setting so a manually set shutter or aperture priority setting should be a feature of your camera.
Now, grab your camera and enjoy night photography.