Flash Motion Tween: Step by Step Tutorial with Images
EducationFlash Motion Tween: Step by Step Tutorial with Images

Every time one switches on Cartoon Network or Animax, one comes across an amazing variety of cartoon characters gambolling and frolicking on the screen. They appear so lifelike that they make you wonder what is real and what is not. This is the world of Animation and it has given a completely different dimension to the entertainment industry. The thriving industry relies on a lot many technologies and software, of which one of the most important is the Adobe Flash.
Here we will find out the basics of making an object move according to a pre planned specification. In Flash terminology, this effect is known as Motion Tween. In some short steps, it is really easy in Flash to make any object move on a pre-specified path, as in this case we have a ball bouncing according to our desire. Read on to know a step by step procedure that will help you move objects in Flash as per your command.
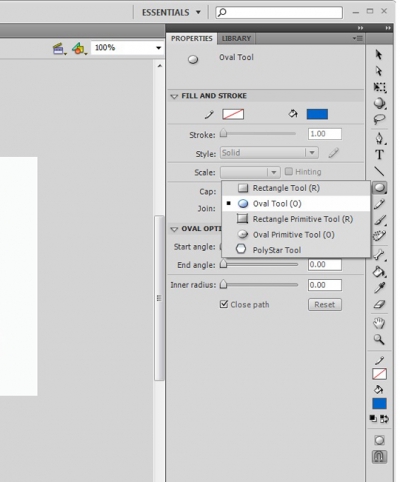
Step 1: Select the ‘Oval Tool’ (O) from the Toolbar & draw a circle in the stage which will be our ball.
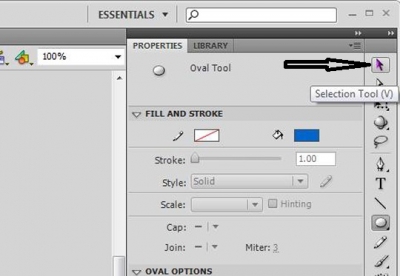
Step 2: Select the ‘Selection Tool’ from the toolbar (V) and drag the ball to the starting point of the motion upon your own choice.
Step 3: Right Click on the ball and select ‘Convert to Symbol’ (F8) to convert the ball to a symbol. In the symbol window select ‘Movie Clip’ as Type and rename it to Ball. [This step is necessary because all animations and tweens can only be performed on the symbols.]

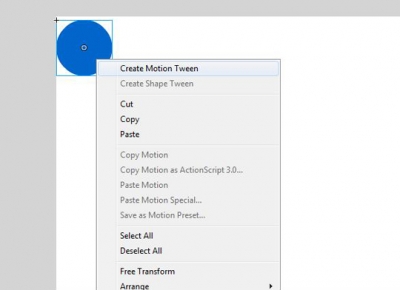
Step 4: After this, Right Click on the ball and select ‘Create Motion Tween’. You can see certain number of frames in the timeline getting Blue in colour. The number is exactly equal to the frame rate of your flash thus allowing us animation of 1 second.
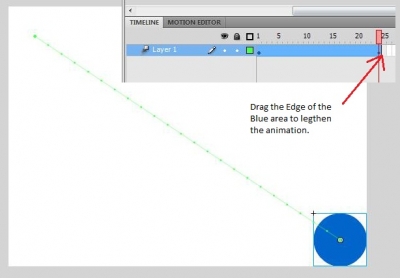
Step 5: Now, drag the edge of the Blue area in the timeline to the required frame to lengthen the animation to your own choice. I have dragged it to frame no. 120 to make it a 5 sec animation as my frame rate is set to 24fps.
Step 6: Drag the ball to the end point of your animation. You can see a line appearing in your stage with dots on it. The line represents the path of the animation & dots represent the position of the ball in each frame.

Step 7: You can change the path of the ball from a straight line to any other path you like by dragging the dots to various points. You can also add more curves to your path by selecting different frames in the timeline and then dragging the ball to the required place. You can also use the ‘Subselection Tool’ (A) from the toolbar to add more accurate curves. Fiddle around with it for a while and you will easily get the hang of it.
With each modification in the different frames in the timeline in between the starting and ending points, you can see small diamond shapes appearing on those respective frames which are called Property Keyframes.
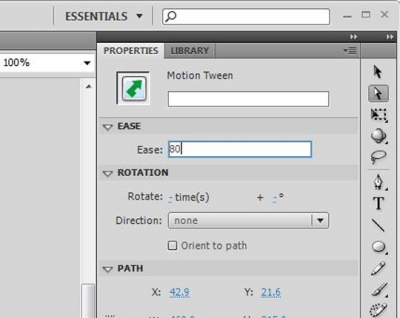
Step 8: After that you can change the ‘Ease’ option in the property toolbar to give the effect of slowing in as the animation progresses or vice versa. I have set it to 80.
Step 9: Select Control->Test Movie (Ctrl+Enter) to see the desired result.

Hence, in a few short steps, you can learn how to make a motion tween in Flash. It is one of the most basic steps of winding your way up the twisting stairs of animation. Flash is an exciting software from the stable of Adobe, and it is not rocket science. Knowing the basics and fiddling with your imagination will reap results.
Do you know some amazing Facts about Youtube. Read them here
A virus is on the prowl, beware Yahoo and Skype users. Read about the threat and how to stay safe here
Photos: Courtesy RashmiRanjan, NIT Rourkela